
It's been quite some time since i made a box, and for those who know me, i like to make boxes to store my stash. My last big need was a box to put my archivals and adirondacks when i go scrapping outdoors.
Coucou tout le monde!
Cela fait quelque temps maintenant que je n'avais pas fait de boîte et pour ceux qui me connaissent, j'aime faire des boîtes pour ranger mon matos. Mon dernier grand besoin était une boîte pour mettre mes encres archival et adirondack pour quand je pars scrapper en extérieur.

Toute la boîte est faite en carton 2 mm recouvert de papier kraft resist de Seigneur Tim of Holtz colorisé à la wild honey et vintage photo stain. J'ai utilisé du kraft gommé (celui qui colle quand on le mouille) pour finir les angles.

Sur le dessus j'ai rajouté un papillon en grungeboard sur lequel j'ai cousu une pointe de plume avec du fil de métal, un art part de Lady Wendy Vecchi tamponné avec le tampon correspondant et un 'p' de papillon sur un grunge block. J'ai gardé le tout très simple, puisque c'est une boîte de voyage.
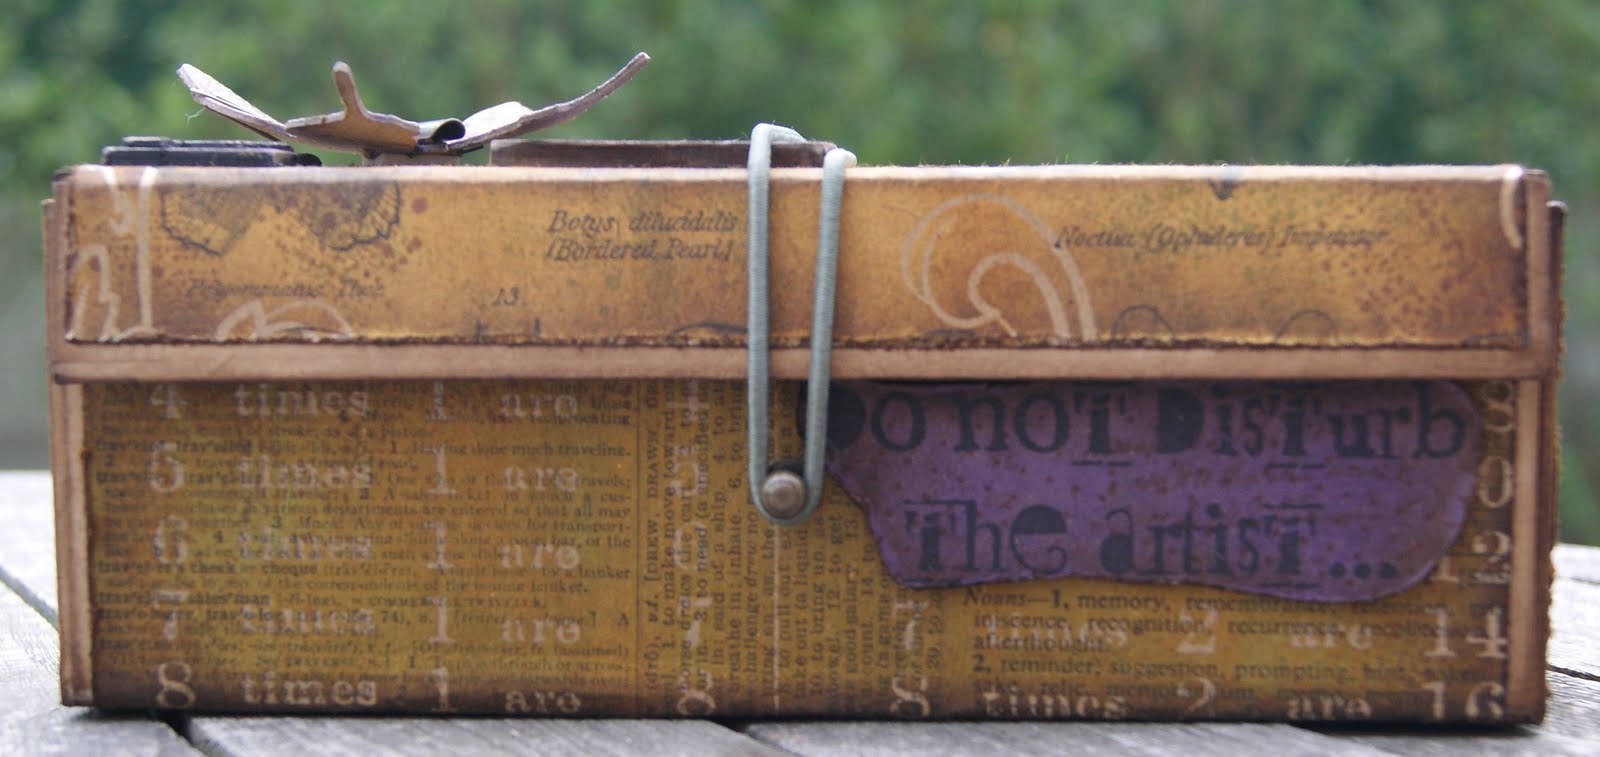
Sur l'avant j'ai attaché un hitch fastener en guise de fermeture et j'ai ajouté un tampon Lady Wendy sur de la mousse 3D.

Pour garder la boîte fermée, j'ai fait un noeud dans l'élastique que j'ai fixé entre deux washers avec un long fastener.

Les 8 archival / adirondack entre parfaitement dedans :)


Now, for the how to...
You need 7 pieces of cardboard: I always work in inches, much simpler than cm. But feel free to convert :p
Maintenant, pour le comment...
Il vous faut 7 morceaux de carton: je travaille toujours en inch, bien plus simple que les cm. Mais n'hésitez pas à convertir :p
Dimensions : INCH:
A: 7 3/4 x 1
B: 7 3/4 x 2 7/8
C: 7 3/4 x 2 3/4
D: 7 3/4 x 2 7/8
E: 7 3/4 x 2 3/4
F and G: 2 7/8 x 2 3/4
Place the pieces one under the other alphabetically. F and G are the side pieces. Attach everything together (just leaving it flat on your desk) using masking tape (the real do-it-yourself kind).
Placez les pièces l'une en dessous de l'autre en ordre alphabétique. F et G sont les côtés. Attachez le tout avec du masking tape (du vrai, celui genre bricolage).

This side (flat) will be the inside of the box. Before taping the outside, close the box like shown in the next picture.
Ce côté (plat) sera l'intérieure de la boîte. Avant de mettre le tape sur l'extérieur, fermez la boîte comme dans la photo ci-dessous.

J'aime mettre les encres dedans pour être sûr que tout soit bien ajusté. Poussez le carton avant et arrière bien vers le bas avant de les coller, de manière à ce que les angles soient nets. Faites de même avec les morceaux latéraux. Le dessous de votre boîte devrait être une surface plate, même aux angles. Maintenant la seule chose qu'il vous reste à faire c'est de décorer et... me montrer ce que vous en avez fait! Si vous mettez un lien dans votre commentaire je me ferai un plaisir de vous rendre visite et de partager un peu d'amour :)


WOW! I absolutely love this! It is amazing! Fabulous project!
RépondreSupprimerAbsolutely beautiful.....as always.
RépondreSupprimerWow! Quelle belle idée! Le résultat est magnifique. Très inspirant!
RépondreSupprimermichelle *Ü*
Good morning! This is absolutely splendid!
RépondreSupprimerIt's fabulous! Thank you for writing and photographing such detailed instructions!
RépondreSupprimerDeb M
xx
Just stunning France, your craft area must just be full of beautiful storage, another stunner, if I get chance I will give this a try for sure x
RépondreSupprimerWHIT WOO!!! I am sooooo loving this France you are such a clever bunny, this is so cool you are the queen of boxes for sure great wonderful work xx
RépondreSupprimerKazxx
Brilliant storage for those inks France! I love the embellishments!
RépondreSupprimerAlison x
absolutely GORGEOUS!!!! Such a fan of your work! :)
RépondreSupprimerlà... tu vas cartonner !!!
RépondreSupprimerSuperbe boîte...
RépondreSupprimerHi France, you are the queen of storage boxes, loving the wild honey colour on this, everything is so cool .... yes I ADORE it! xx
RépondreSupprimerYour box is absolutely wonderful! Love the colors and the ingenious way u added the strap to hold it closed. :-)
RépondreSupprimerYou are definitely the Queen of Storage Boxes!! Love it!
RépondreSupprimerWhat a wonderful box - love it! But then, I love everything you create!
RépondreSupprimerFantastic box... love it.
RépondreSupprimersuperbe
RépondreSupprimerbravo md
I particularly love how you used a pencil for the body of the butterfly. And that BOX! Oh my! I think I may have to create one for my stash of inks! TFS
RépondreSupprimerWow! I LOVE this box, it's gorgeous. I'm inspired to go make one for my inks now too. Thanks so much for the tutorial. I've made boxes to fit cards, wallhangings or small gifts. I've occasionally altered existing boxes to pretty them up for storage but I've never made one from scratch as gorgeous as yours, one made to measure with snug & neat storage for something as solid as a collection of inkpads. tfs
RépondreSupprimerAlexandra
Oooooooo M'dame Papillon!!!!J'adore!!!!
RépondreSupprimerMerci pour les explications, je vais m'y mettre, je veux la même!!!!!
Bizzzz Carine
So beautiful, France! Would love to be crafting on the go with you.
RépondreSupprimerwaouwwwwww j'adore elle est superbe et très pratique a transporter quand on va chez les copinettes
RépondreSupprimerbizous
vivi
BONJOUR Françoise
RépondreSupprimerWAWWW WAT EEN MOOIE TUTO BEDANKT
LIEFS AKKINA
Lovely as ever and great instructions - might be tempted to have a go!
RépondreSupprimerThat is fantastic......... almost to nice to put dirty tools in.....lol. I love it!
RépondreSupprimerOh this is awesome!!! Love your blog!
RépondreSupprimerencore un tuto tu n'arrêtes pas,merci encore une fois, c'est trop trop beau, de merveille en merveille,bisous
RépondreSupprimerJ'ai découvert ton blog via "carnet de scrap" et je suis tombée sous le charme de tes boites ! elles sont superbes ! alors BRAVO !
RépondreSupprimeret merci de nous faire partager tes secrets ...
j'ai découvert tes créations dans le dernier carnets de scrap et je suis sous le charme. Tes boîtes sont ravissantes.
RépondreSupprimerLiliane
I'm so pleased I've found your wonderful blog and creations, I love them can't wait to have a go! From a new fan of yours, Joy
RépondreSupprimerCoucou ma belle France,
RépondreSupprimerI have just found this fab tutorial for you beautiful travel box - not sure how I missed it before. Your finished box is gorgeous. Do you remember where you found/bought the metal borders?
I have missed seeing you amazing videos and sending you lots of hugs and warmest best wishes.
Susanne